Do you want to show your Google Slides presentations online? Learn how to embed Google Slides into a website or publish your presentation online.
Advertisement Advertisement Advertisement Advertisement Advertisement Oct 3, 2017 • 12 min read This post is part of a series called How to Use Google Slides (Ultimate Tutorial Guide).If you want to show Google Slides online, there are several ways to do it. You can embed a Google Slides presentation into a website or document. Or, you can create a unique link to your presentation that allows you to share it through Gmail or social media.
While the two methods of sharing your Google Slides presentation online may seem similar, there are some important differences. To make the best choice for your online presentation needs, examine both options.
In this tutorial, you'll learn how to publish and embed Google Slides presentations online. We'll discuss the differences between embedding a presentation and creating a link. Finally, we'll give you step-by-step instructions for publishing and embedding your Google Slides presentations online.
Also, before you dive into this tutorial, download our new eBook: The Complete Guide to Making Great Presentations. It's available for FREE with the Tuts+ Business Newsletter. Learn how to write, design, and deliver the perfect presentation.
If you need to share a Google Slides presentation online, you may wonder whether there is a difference between using a link and using an embed code. Although both methods of publishing a presentation to the web are similar, there are some differences.
The following questions illustrate the differences between the two methods:
If you've embedded the presentation into your website, the presentation becomes part of your website. Anyone who has access to your website can see it. The Google Slides Embed feature also allows you to define screen size.
Embedding a presentation can be useful for including general information on a company website. For example, your company's history or vision statement would be of interest to all potential customers. A Google Slides presentation on either of these topics would be good to embed into your business website.
In contrast, when you publish a Google Slides presentation to the web it appears in its own URL. To give others access to the presentation, you must share that URL link. Only those who have the link can see the presentation.
If your Google Slides presentation is targeted to certain individuals, publishing it to the web as a link is a better option than embedding it into your website. For example, you may have a sales presentation geared to your client's needs. If you publish it to the web as a link and then share that link through Gmail to your client, then only your client will be able to access the presentation (as long as they don't share the link).
Now that we know the differences, let's look at how to publish and embed Google Slides presentations:
To get a quick head start on how to publish and embed Google Slides, look at our screencast video:
For more detailed instructions on using the Embed and Link features to publish your Google Slides presentation, study the written steps below:
You can embed a Google Slides presentation into your website or other document in a few easy steps. Let's get started:
To start, make sure that you're logged into your Google account. Open your Google Drive by typing drive.google.com in your browser's address field. Your Google drive displays:
.jpg)
Double-click on the name of the presentation to open it:
.jpg)
Note: This sample presentation is based on the Fox presentation template from Envato's GraphicRiver (no longer available). It also uses the fictitious company name, AnyTown Consulting. Discover more great Google Slides templates:


Once your presentation opens, you're ready to access the Embed option. Start by selecting File > Publish to the web:
.jpg)
The Publish to the web dialog box appears. Click on the Embed tab to open it:
.jpg)
Open the Slide size drop-down menu by clicking on the up and down arrows:
.jpg)
Select a slide size by clicking on it in the drop-down menu. Next, open the Auto-advance slides drop-down menu by clicking on the up and down arrows:
.jpg)
Your Auto-advance selection defines how long your Google Slides presentation shows a slide before advancing to the next slide. Notice that three seconds is the default. To make a different selection, click on it in the drop-down menu.
Now it is time to determine whether your slideshow starts automatically and whether it loops. To do this, use the check boxes:
.jpg)
To start the Google slideshow as soon as it opens, click the Start slideshow as soon as player loads check box. If you want the slideshow to begin again after the last slide displays, click the Restart the slideshow after the last slide check box.
When you've finished making your selections, click the Publish button. A prompt appears asking: Are you sure you want to publish this selection? Click OK. Embeddable code appears within the Publish to the web dialog box:
.jpg)
You're now ready to add the presentation to your website.
For this section, we'll use a WordPress site as an example. To copy the presentation code from the Publish to the web dialog box, highlight it and press CTRL+C.
Open the WordPress page or post where you want to embed the code:
.jpg)
Make sure that you're on the Text tab, not the Visual tab. Press CTRL+V to paste the code from the clipboard to the post or page.
Click on the Publish button in the lower right of the screen when you're done. The Google Slides presentation is now part of your website. Whenever anyone opens the page where you've embedded the code, they'll see your presentation.
You can stop publishing a Google Slides presentation if needed. This means that you'll no longer be able to embed code into a website.
To stop publishing your Google Slides presentation, click the Stop publishing button at the bottom left of the Publish to the web dialog box (under Published content & settings):
.jpg)
A prompt appears asking: Are you sure you want to stop publishing this document? Click OK.
You can no longer use the embed code to add the presentation to a website. Be sure to follow up with any pages you already have the code added to, and remove them.
Use the Publish to the web option to create a link that can be shared online through social media or through Gmail. If you want to control who has access to your Google Slides presentation, this method is handy since only those with the link can see it.
Let's get started:
Just as we did when we created an embed code, we'll start by opening the Google Slides presentation.
First, make sure that you're logged into your Google account. Open your Google Drive by typing drive.google.com in your browser's address field. Your Google drive displays along with any files stored there. Double-click on the name of the presentation to open it.
After you've opened your presentation, selecting File > Publish to the web menu option:
The Publish to the web dialog box appears. The Link tab opens by default:
.jpg)
Next, open the Auto-advance slides drop-down menu by clicking on the up and down arrows:
.jpg)
Define how long your Google Slides presentation shows a slide before advancing to the next slide with the Auto-advance slides menu option. Options range from every second to every minute. To make a selection, click on it in the drop-down menu.
Use the check boxes to determine whether your slideshow starts automatically and whether it loops.
To start the Google slideshow when it opens, click the Start slideshow as soon as player loads check box. If you want the slideshow to begin again after the last slide displays, click the Restart the slideshow after the last slide check box.
When you've finished making your selections, click the Publish button:
.jpg)
A prompt appears asking: Are you sure you want to publish this selection? Click OK. A shareable link appears in the Publish to the web dialog box:
.jpg)
You're now ready to share your Google Slides presentation.
Share the Google Slides presentation by pressing CTRL+C to copy the link. Then paste the link to a document using CTRL+V and email or otherwise give the document to someone. As soon as your recipient clicks on the link, your slideshow opens.
Note: Sharing a published link is not like sharing your presentation through the Share button on the right of your Google Slides screen. Those who click a link to your published presentation can't edit it or make comments.
You can also use the sharing icons to share your link. Here are the four options for sharing using the icons:
To share your Google Slides presentation to a platform not listed in the icons, cut and paste the link directly into a document or post.
To share your link through social media, click on the social media icon. For this example, we'll use Twitter. Click on the Twitter icon (the last icon on the right) in the Publish to the web dialog box. A new window opens prompting you to log in to Twitter:
.jpg)
Type your username and password and click the Log in button to log in to Twitter. A new browser window opens with a tweet that contains the words Email Presentation:
.jpg)
Paste your Google Slides presentation link into tweet. If you want to, add more text. When you are ready, click the Tweet button in the lower right corner. You've just tweeted your presentation link to your followers.
The process for sharing the link to other social media platforms is similar.
Caution: Remember that your social media friends and followers may reshare your link. Anyone they share the link can also see the Google Slides presentation. To limit who can see your presentation, don't share it to social media.
Gmail Sharing Example
Let's see what happens when we use the Gmail sharing icon. We'll start by clicking on the Gmail icon (the second icon from the left).
If you're logged in, your Gmail email opens in a new browser window:
.jpg)
If you're not logged in, a log in screen appears. Log in to your email account.
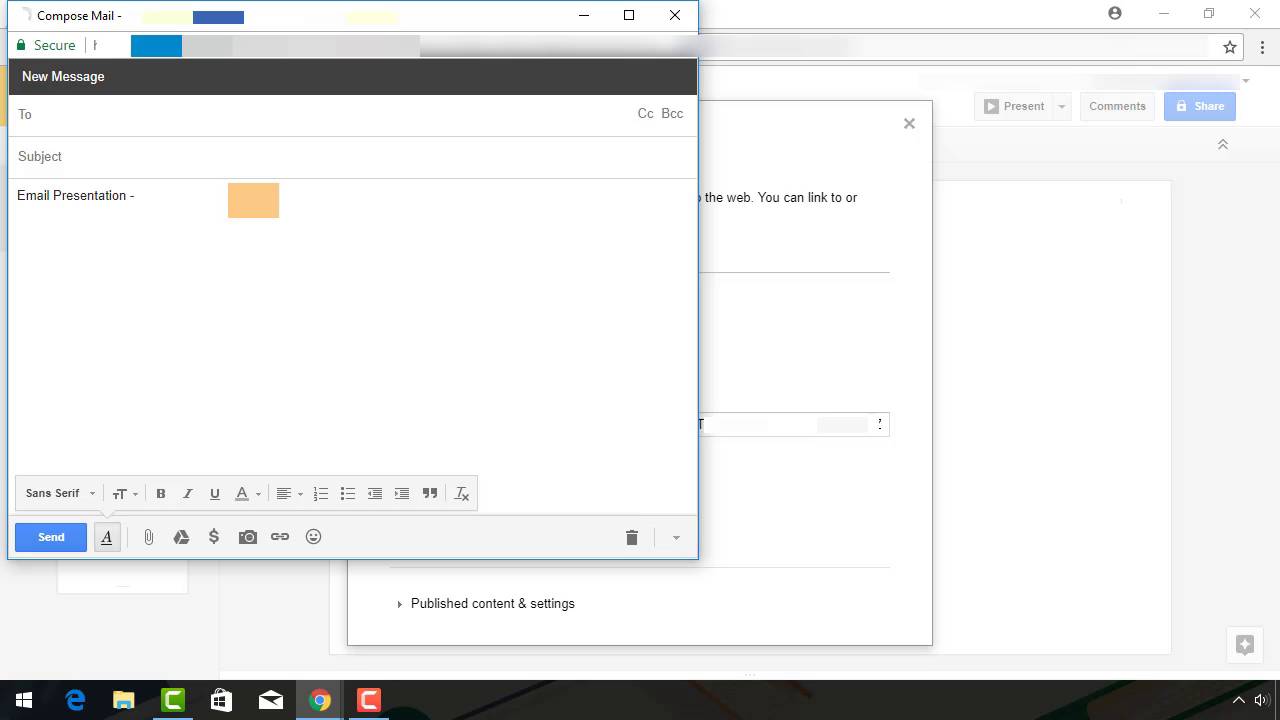
Gmail opens. The link to your presentation is already in the body of the email message. Type the name of the recipient and the subject line. Add more text to the body of the Gmail message, as needed.
When your message is ready to go, click the Send button in the lower left corner. As soon as the recipient clicks on the link in the email, the Google Slides presentation opens.
Caution: Remember that email messages may be forwarded. If you want to limit who sees your presentation, ask your contacts not to forward the email.
You can stop publishing the Google Slides presentation. After you've stopped publishing it, you'll no longer be able to share a link to your Google Slides presentation.
To stop publishing your Google Slides presentation, click the Stop publishing button at the bottom left of the Publish to the web dialog box:
.jpg)
A prompt appears asking: Are you sure you want to stop publishing this document? Click OK.
You can no longer use the link to share your Google Slides presentation.
If you aren't going to give your Google Slides presentation in person, you need a way to get it before your target audience. Publishing it to the web provides the perfect answer.
Your Google Slides presentation can be part of your business website or you can share it through social media and email. Now that you know the differences between the two options, you can make the right choice for your business.
You're now ready to go ahead and share your Google Slides presentation online. For more information on using Google Slides, review our tutorial series: How to Use Google Slides (Ultimate Tutorial Guide), or jump into these tutorials:
![]()
![]()
![]()


Take the knowledge you gained in this tutorial further with our new eBook: The Complete Guide to Making Great Presentations. Grab this PDF Download now for Free with your subscription to the Tuts+ Business Newsletter.

It will help walk you through the complete presentation process. Learn how to write your presentation, design it like a pro, and prepare it to present powerfully.